Test Plan
The crucial step in testing any application is developing a clear and a precise test plan. A good test plan enables the team to assess the quality of the application under test at any point in the software development life cycle.
Following functionalities are very important in order to understand in the test plan module better. Click on each one of the functionalities to know more about it.
| Functionality | Description |
|---|---|
| Creating Tests | This module describes how to create folders of test subjects in the test plan tree and also to add tests. |
| Uploading Tests | Uploading Tests using ALM-MS Excel Addins |
| Requirement and Test Coverage | Enables how to define the relationship between the requirements and tests. |
| Test Configuration | Specifies the subset of data or a run-time environment that the test should use. |
Create Tests
Tests are created based on the requirements. Creating tests and covering all scenarios/parameters is the crucial factor for the success of any product.
Let us take a look at how to create a test suite and its important significance.
Step 1 : Create a Root folder as a container for having the test sets.

Step 2 : Click New Test Button and Enter details of the test Scenario and select the test type as shown below.

Step 3 : Select the Test and The Tabs would be generated as shown.

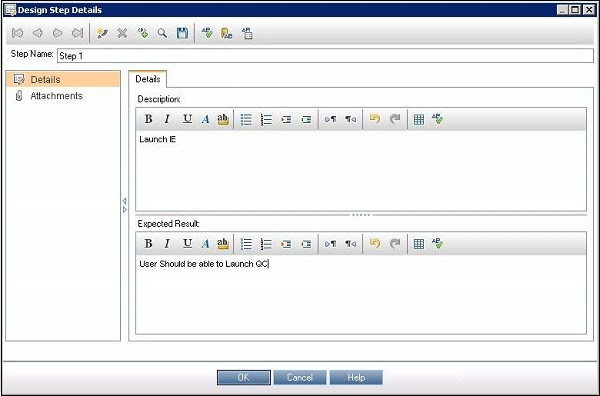
Step 4 : Click on design step details and give step name, details and description.

Step 5 : All the design steps can be accessed using "Design" steps tab as shown below.

Step 6 : Test Parameter Details are entered using "Parameters" Tab.

Step 7 : One can view history of this particular test case in History-Audit Log tab as shown below.

Create Tests
Every time the user will NOT be in a position to create test cases manually. Hence HP has come up with an excel Addin with which the user can upload from excel directly. Let us understand the step by step procedure to upload test cases into QC from Excel.
Step 1 : Navigate to ALM home page and click on "Tools" from the list of links.

Step 2 : Click on "More HP ALM Addins" Link from the addins page as shown below.

Step 3 : In the Addins page, select "Addins for Microsoft applications" and choose "Microsoft Excel"

Step 4: Upon selecting "Microsoft Excel", choose ALM 11.5 Excel addin. The exe file will be downloaded. Please also take a note of the supported MS Office Editions as shown in the below screenshot.

Step 5 : Once the Addin is installed, upon opening the excel file one can see "Export to ALM" button under Addins tab.

Step 6 : Select the Records that one would like to upload into ALM and click on "Export to ALM Button". The HP ALM Export Wizard opens as shown below. Enter the Quality Center URL.

Step 7 : Enter the Quality Center credentials to successfully establish a connection.

Step 8 : Select the Domain and Project as shown below and click "Next".

Step 9 : Select the Type of data that the user wishes to upload. In this case it is "Tests".

Step 10 : Enter a New map name. Upon creating once we can reuse it any number of times for uploading tests.

Step 11 : The Field Mapping Dialog opens. Here the user has to map the field in Quality Center against the column ID in Excel.

Step 12 : Once the Field mapping is done, click Next.

Step 12 : Hp ALM will start uploading the tests into Quality Center and shows the progress as shown below.

Step 13 : If the upload is successful, the HP-ALM Export Wizard would show the message that it got successfully uploaded.

Step 14 : Upon successful upload, the uploaded Test cases can be seen in HP-ALM directly.

Requirement and Test Coverage
As a tester, one would be intersted in establishing the connection between requirement and test coverage. This will help the test managers to take informed decisions about the status of each one of those requirements. Let us now understand how to link requirements and tests so that the metrics can be genenerated.
Step 1 : Goto the Test Plan tab and select the test against which the requirement has to be mapped.

Step 2 : Click "Select Req", the requirement tree opens in right pane and user can select the related requirements.

Step 3 : This mapping is important to generate traceability matrix, and upon execution of tests we will be able to see what percent of tests for a specific requirement has passed/failed.
Test Configuration
Test Configurations helps the testers to test various use cases with a different set of data. Testers can use a single test to cover multiple requirements by associating to different test configurations in the same test for each requirement.
It can also correspond to a run-time environment and can be associated with test configuration with data in the Parameters tab of the Test Plan module. Following are the steps to work with Test Configurations.
Step 1 : Ensure that the prerequisite such as requirement and test cases are created. Tests are created with parameters.
Step 2 : The Test Configuration is created by navigating to the "test configurations" tab of test plan module. One Default configuration is present in the list.

Step 3 : Click on "+" Icon to create a New test configuration and test configuration window opens as shown below.

Step 4 : Upon creating new test configurations, the test configuration is listed as shown below.

Step 5 : Create Requirement coverage as discussed in previous module - Requirement and Test Coverage.
Step 6 : Create test set in test lab module and execute them for each one of those configurations.
Step 7 : Upon execution, analyze the results in test runs tab.
No comments:
Post a Comment